Well, the weather is finally cooling down and I have gone back into the sewing room. Once again I have been tackling the piles and trying to finish SOMETHING. I was sewing more black and white blocks for guy quilts and had a new sewing experience (and that is saying something because I have been sewing almost 50 years and have had a lot of things happen!) I had changed the bobbin and started sewing and instead of the fabric moving nicely along and making lovely perfect stitches I was getting tiny weird stitches that would not go in a straight line! PANIC? Yeah, at first my brain went--oh no, what will I do if the machine is broken? Who can fix it? How can I afford to get it fixed? How can I live without a machine? And then I retraced my steps and took out the bobbin and put it back. Still bad. So I took out the bobbin casing, cleaned and oiled under there. Still bad. The feed dog didn't seem to be working--I popped it down and it didn't come back up. HUH??? Then I tried to raise and lower the foot with the knee lift and it didn't work. HUH?? Usually when that happens it means the knee lift is hitting the side wall so I moved the machine around a bit and got the foot to lift. I tried to sew again and YAY it was working. I think the knee lift was just enough off that the feed dogs didn't move. I was so glad I didn't stop at PANIC and kept trying to figure it out!
On a totally different subject- I am watching Project Runway and they are doing the fabric design challenge so I got curious about what would be involved if a "real person" wanted to design fabric and get it made. The first siteI tried was Spoonflower http://www.spoonflower.com/shop?shop=fabric and I was so excited to see Doctor Who fabric--300 of them! My daughter is obsessed with Doctor Who and my head is spinning trying to figure out something to make her without spending a fortune! My brain is in overload and I am excited. I am leaning toward a Tardis pillow for Christmas (I can say this because she NEVER reads my blog!). Emma is getting very involved with My Little Pony (Oh, yeah, vote for her pony to will the Bronycon contest! http://bronycon.org/vote/ ) and I am trying to think of something she could design and make to sell that would be profitable since the fabric is $18 a yard==bookmarks? This challenge will keep me going for days, I am sure. If anyone has any ideas, please post!
Thursday, September 20, 2012

Sunday, August 26, 2012
Sometimes You Just Have to Step Back
 |
| Novelty fabric strip border |
First up-- sew the vertical seams on the X Marks the spot quilt to get that top done. Check. Next--figure out a border for it. Since it is a lot of novelty prints I went to the box of pre-cut novelty squares. (About once a year I go through my tote of novelty fabrics and cut 6 1/2, 5 1/2, and 2 1/2 inch squares of each fabric). I had done a border for something else using the 6 1/2" squares cut in half then sewing them together as a border and thought that might work. I had also done one with alternating strips made of 3 squares of solids and would have done that again but it would have required cutting those solids again and that was just too much work.
 |
| 1 1/2 " strips used as sashing |
After sewing most of the border I attacked the mess pile and found the black & white check blocks to make into charity quilts for guys so I trimmed up and put it up on the design wall for the next time.
I didn't have any idea what I was going to do when I walked into the sewing room but I am happy with what I came up with when I stepped back and saw what was hanging there all along!
Sunday, July 15, 2012
Summer is for Quilting?????
Hi friends
I have not forgotten about this blog or about quilting. It has just been too uncomfortably hot in the sewing room. I did decide one day to take the ironing board and cutting board out to the kitchen where it is cooler and I set up my laptop to watch Warehouse 13 for a couple hours (Spoiler alert-warehouse blown up, Mrs Fletcher dust!) I got as much pressing and cutting done as I could and would go sew for 10 minutes or so at a time. Summer is definitely not my best time for quilting!
I had to go back to the the X marks the Spot blocks for a while because I actually used up all the "medium florals" on the watercolor borders. But I am excited about that because it gives me something to shop for with my birthday coupon at Emma's Quilt Cupboard! (http://www.emmasquiltcupboard.com/)
So stay tuned for progress--the next cool day I will be back in there!
I have not forgotten about this blog or about quilting. It has just been too uncomfortably hot in the sewing room. I did decide one day to take the ironing board and cutting board out to the kitchen where it is cooler and I set up my laptop to watch Warehouse 13 for a couple hours (Spoiler alert-warehouse blown up, Mrs Fletcher dust!) I got as much pressing and cutting done as I could and would go sew for 10 minutes or so at a time. Summer is definitely not my best time for quilting!
I had to go back to the the X marks the Spot blocks for a while because I actually used up all the "medium florals" on the watercolor borders. But I am excited about that because it gives me something to shop for with my birthday coupon at Emma's Quilt Cupboard! (http://www.emmasquiltcupboard.com/)
So stay tuned for progress--the next cool day I will be back in there!
Sunday, June 24, 2012
Cut-Sew-Press Part Deux
I feel like I am a slacker these days because whenever I go into the sewing room it is just too hot! I really need to figure out a way to have a fan that cools but doesn't blow fabric, threads, and papers all over the room. So far, no success.
I have puttered around in the sewing room making more units for the watercolor borders. This is one of my favorite techniques and I have done it in beiges, black & whites, blues, primary colors w/ lots of novelty prints, and the floral watercolor fabrics. When I make the "units" I make them in various sizes but all the same 6 1/2" width and then put the units together to make the right size for the border. I have also scattered Ohio Stars throughout the border (but have no picture of this one!)
Quickie tutorial: Start with squares, triangles, strips of all sizes in the fabrics you are using. Basically, think Log Cabin and work around the piece, trying not to have any long strips anywhere, as these will probably be "galloping horses" in the end. I try to balance the fabrics in each "unit" so there is a little of everything throughout. When the piece is the width you choose (I use 6 1/2") you are done with that unit.
Here a some examples of quilts with this type of border. Hopefully you can zoom in to see detail, if you are interested. It is a fun cut-sew-press-cut-sew-press technique.
I have puttered around in the sewing room making more units for the watercolor borders. This is one of my favorite techniques and I have done it in beiges, black & whites, blues, primary colors w/ lots of novelty prints, and the floral watercolor fabrics. When I make the "units" I make them in various sizes but all the same 6 1/2" width and then put the units together to make the right size for the border. I have also scattered Ohio Stars throughout the border (but have no picture of this one!)
Quickie tutorial: Start with squares, triangles, strips of all sizes in the fabrics you are using. Basically, think Log Cabin and work around the piece, trying not to have any long strips anywhere, as these will probably be "galloping horses" in the end. I try to balance the fabrics in each "unit" so there is a little of everything throughout. When the piece is the width you choose (I use 6 1/2") you are done with that unit.
 |
| Blue Border |
 |
| Watercolor floral border- units are light,medium, &] darks |
 |
| Navy borders X2 |
.JPG) |
| Primary Novelty border |
 |
| Black & white borders used as strips on the back |
Thursday, May 31, 2012
Saving Time so you can sew more!
 |
| Zigzag 9-patch made in an afternoon workshop |
Not only did I learn this technique but went away with a great handout of different settings which I have used and shared with every class I taught. So thank you, Marianne!
 |
| Line the strip set up with cutting board lines |
 |
| Place 2nd strip down from 1st strip about 1/2" down |
 |
| Lay out all strips until you have no more room |
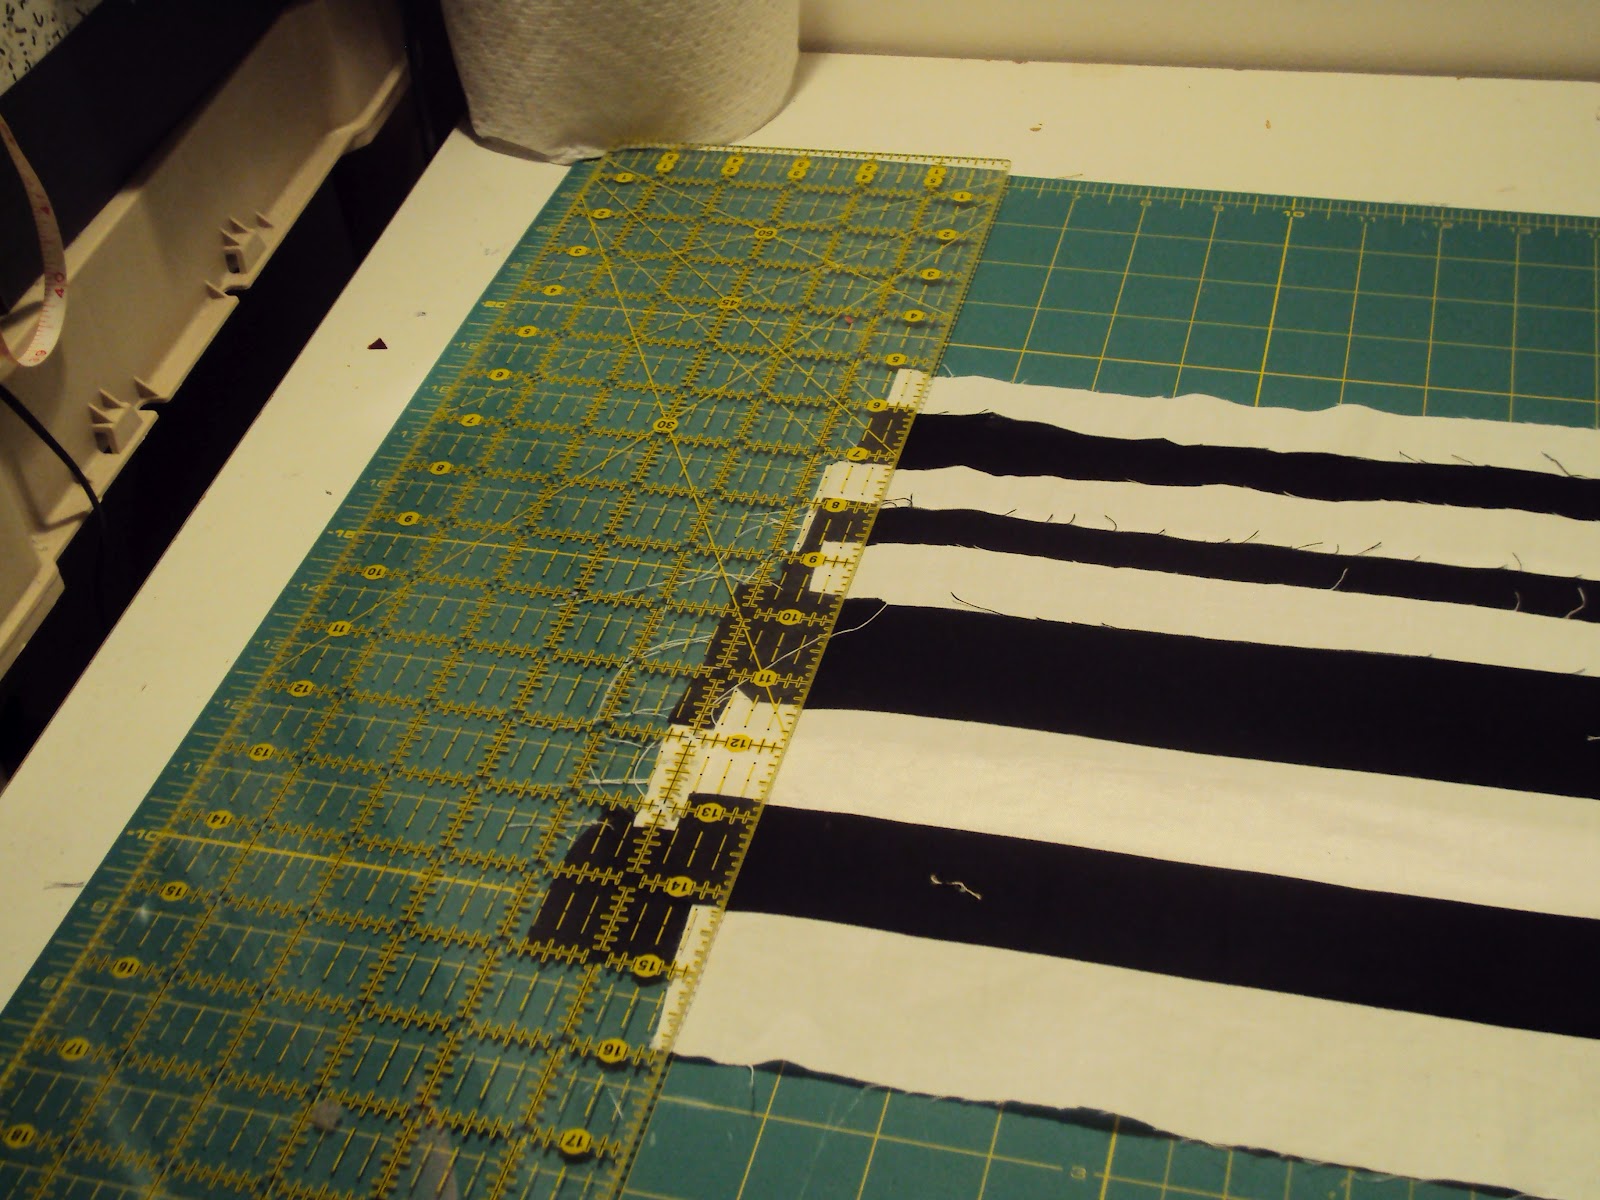 |
| Line up ruler w/ vertical lines, then cut the bruised edges off |
 |
| Cut through all layers (the same measurement as width of strips) |
The great time saving technique is especially great for 9-patches. You start by sewing the strips in groups of 3--2 sets of dark/light/dark and 1 set of light/dark/light. (It is important when sewing strip sets together that you sew top to bottom, then bottom to top, then top to bottom, etc. or else your strip set will stretch and curve and you don't want that.) Press the seams toward the darks. Let's go with 2" strips for the sake of this exercise. After the strips are pressed, line up one piece on your cutting mat using the lines on the mat as a straight line. Take the next strip set and stagger it about 1/2" down from the first, making sure that you are far enough down that the seams aren't on top of each other. Keep laying down as many strips as you can fit on the board, keeping the strips straight using the lines on the mat. You will then cut 2" pieces all along the whole thing. This works so well for several reasons--You can cut a lot of strips in 1 cut, and because the strips are all stuck together and lined up with the lines on the mat they do not slip and you get nice straight cuts, and you are never cutting through more than 4-6 layers of fabric at a time. Try it and you will wonder why you spent so much time sub cutting before!
 |
| Continue cutting to the end of pieces |
(I apologize for the confusing pictures. I am working with black and white and actually thought it would make a good demo, but you can't tell where one piece starts and the next begins! I placed them on the board alternating black and white so in the final layout there are 6 strip sets. Hope you can figure this out)
Sunday, May 27, 2012
Charity Begins at Home
Goodness, I haven't posted in over a week but that doesn't mean I haven't been in the sewing room. I have gone in and started sewing and it is so hot I had to quit when the first drop of sweat ran down my back! I got the funky border finished and on the 9-patch novelty quilt, made some more X marks the spot blocks, and did some other puttering around.
I also did some research into the Downy Quilts for Kids program to see what their requirements are for quilts to donate. Check it out http://www.quiltsforkids.org/about/. Basically they have to be around 38 x 45", all cotton, and machine quilted. Darn it but the one I just finished is too big for this but I will put it aside for another donation. I have a mission to make as many quilts as I can to donate and use up all these fabrics! You would think with this mission in mind I wouldn't buy any more fabrics but sometimes I just HAVE to go into the fabric store and pick up something new! (It kills me because I live within a couple blocks of 2 fabric stores and drive past every day!). Right now I am really low on black and whites and have no yellows or oranges to speak of and you really need brights for kids quilts so that is how I justify dropping a few bucks in there.
Quilts for Kids really needs quilts for teenage boys right now and that is a hard one. I was thinking about it and got inspired when I turned on the TV today and caught the start of the Indy 500. I have never watched a Nascar race and had never seen the beginning. When they showed the pace car and the pack all lined up in groups of 3 I thought it was one of the coolest things I have ever seen in sports! It got me thinking about the checkered flag and cars. So today I started making black and white checked blocks and I will probably go nuts making tops with checked blocks and borders. I have several ideas but I do need more "guy" fabrics. I have a couple with cars and sports. So if anyone would like to donate to the cause with their scraps of "guy" fabrics I would love to take them. Just leave me a message here or on Facebook or send me an e.mail and we will work something out. Meanwhile I am going to keep sewing black and white strips together!
I also did some research into the Downy Quilts for Kids program to see what their requirements are for quilts to donate. Check it out http://www.quiltsforkids.org/about/. Basically they have to be around 38 x 45", all cotton, and machine quilted. Darn it but the one I just finished is too big for this but I will put it aside for another donation. I have a mission to make as many quilts as I can to donate and use up all these fabrics! You would think with this mission in mind I wouldn't buy any more fabrics but sometimes I just HAVE to go into the fabric store and pick up something new! (It kills me because I live within a couple blocks of 2 fabric stores and drive past every day!). Right now I am really low on black and whites and have no yellows or oranges to speak of and you really need brights for kids quilts so that is how I justify dropping a few bucks in there.
Quilts for Kids really needs quilts for teenage boys right now and that is a hard one. I was thinking about it and got inspired when I turned on the TV today and caught the start of the Indy 500. I have never watched a Nascar race and had never seen the beginning. When they showed the pace car and the pack all lined up in groups of 3 I thought it was one of the coolest things I have ever seen in sports! It got me thinking about the checkered flag and cars. So today I started making black and white checked blocks and I will probably go nuts making tops with checked blocks and borders. I have several ideas but I do need more "guy" fabrics. I have a couple with cars and sports. So if anyone would like to donate to the cause with their scraps of "guy" fabrics I would love to take them. Just leave me a message here or on Facebook or send me an e.mail and we will work something out. Meanwhile I am going to keep sewing black and white strips together!
Wednesday, May 16, 2012
Novelty Prints-Love 'Em!
I decided I had to step away from the Wacky nightmare quilt and assembling the tops I had arranged on the wall and do something totally different for a day or so. So I reached into the UFO box and pulled out a ziploc bag of 5" 9-patch blocks of solids. Hmmm 5"--isn't that the same size as those novelty squares I got a while back in that trade? YES! So I alternated them and will have a nice child's quilt for charity.
Made me think of all the quilts I have made with my huge collection of novelty fabrics. About once a year I go into the box and cut 6 1/2", 5" and any other size I think I might use out of each fabric. I love novelty prints but last time I went into the box I realized how tired I am of my fabrics so I found a place that does organized fabric swaps (it was a site called Fabric Stash Club and they seem to have shut down). I think I sent 50 5" squares and I got back 50 totally different pieces. I think I will share some of my different novelty quilts to show ways to use various sizes of squares. You will also see my extensive use of strippys.
 |
| Novelty Attic Windows-6" sq. |
.JPG) |
| I Spy-3" squares w/ 6" squares cut in half in the border |
 |
| Double 9-patch w/ 3" squares (6" sq cut in fourths) |
 |
| 6" sq w/ star sashing (this sashing takes LOTS of fabric |
 |
| 6" sq with strippy sashing |
 |
| 5" squares w/ solid attic windows |
.JPG) |
| 6" sq w/ strippy sashing & 4" squares in border |
.JPG) |
| 6" sq cut diagonally & pieced w/ solid strippys |
 |
| 6" wide pieces w/ white/black fabrics sashing |
 |
| 5" sq w/ bright attic window |
 |
| 4" sq w/ zig zag sashing (took LOTS of red!) |
 |
| Braided novelty-started w/ 6" sq cut in half |
 |
| Pinwheels made from same pieces as braided novelty |
 |
| Star sashing w 6" squares |
 |
| 6" sq with star sashing |
 |
| 6" sq with strippy sashing |
 |
| Border is 6" sq cut in half |
 |
| Star sashing w/6" sq |
Subscribe to:
Posts (Atom)