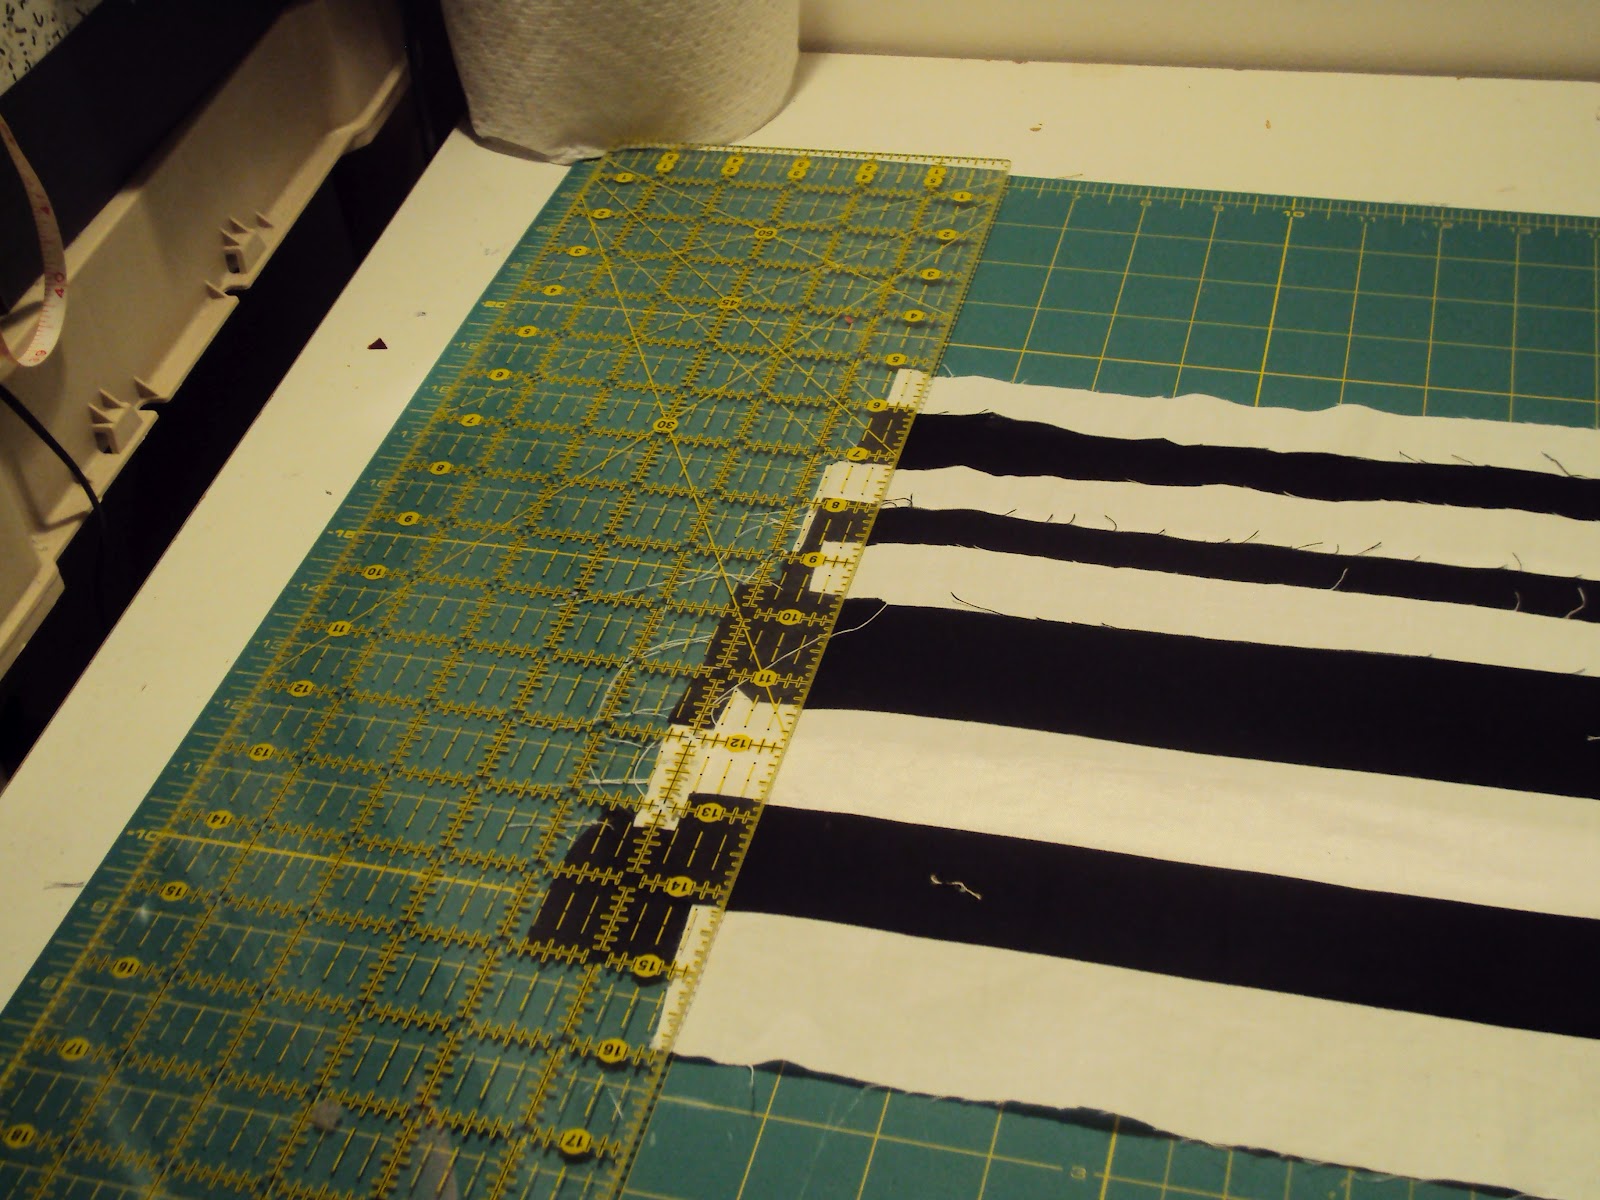
I realize I haven't posted lately and that is because lately quilting has reached the "chore" stage for me so I have to really WANT to be in there and nowhere else. I know I have mentioned my least favorite step is putting on borders. Don't know why--it just is. So the other day as I was measuring and sewing border #1 on a quilt I thought I would share my border measuring technique and how it evolved from that first quilt to today.
I learned how to quilt using a rotary cutter and quick techniques from the Eleanor Burns books and TV show. For a couple years I watched every week and sewed quite a few quilts from her books. And they all had one thing in common--the borders sucked! They rippled and puckered. Looking back, she had you cut the border the width you want and just sew it on and cut it off. Well, guess what. Side A border might end up a couple inches bigger than side B! So after a couple "unflat" quilts I tried measuring first. Well, I have never had a large sewing area big enough to lay out the quilt to measure or a measuring tape big enough so that technique left me with pretty much the same results! Then I learned somewhere to always measure through the middle of the quilt, not the edge, as the edges may be stretched. That was good advice and I stick with that on every quilt. However I soon realized that I really had no use for a "number" measurement for the border and if you measure the quilt and get a number you then have to measure the border to get the same number and that was a real pain. So I figured out that you can measure with the actual borders. I cut the borders the width I need and I use 2 border pieces (why measure one off the other when you can measure them both the same time--took me a few quilts to realize this!) . I pin them together and pin to one edge at the middle of the quilt. Since I don't have space, I smooth the top and pin every foot or so and keep going to the other edge. If it is a straight edge border, I just cut off even with the second edge of the quilt. A mitered border is just as easy. Cut the first end bias cut and start pinning to the quilt, with the short edge (the part you actually sew onto the quilt--I can't think of a name for this) at the edge. Measure through the middle and mark the end spot with a pencil or pin to show where to start cutting the second bias cut (making sure to get it going the right way!) Bingo-perfectly sized, matching borders. And a bonus with mitered borders is that you can measure and cut all 4 before you sew--with straight cut borders you have to sew the first 2, press, and measure for the second set.
Now that they are cut they have to be sewn on. Do not do it Eleanor Burns style and just start sewing! Fold the border in half and mark with a pin. If it's quite long, fold and measure the middle again. Find the middle and quarters of the quilt top also. Pin to the quilt at the ends, match and pin to the middle, and match the quarter measure if you need it. Holding the pinned places I shake a little and smooth and pin as many more times as I think I need. If it appears to need a little easing or stretching adjust between the pins as you sew and do not remove the pins until you are there. The rule of thumb with sewing is to put the larger piece on the bottom as the feed dogs will naturally ease a little, but if you are sewing a quilt top with lots of seams to a plain border you have to have the quilt top on top so you can get all the seams going the right way. As Tim Gunn says "Make it Work". Trust me, you will have a nice smooth top and the parallel borders will match.
Well, now that I have stalled my border sewing by talking about border sewing I guess I had better go sew a couple borders before Hurricane Sandy hits and we lose power!
Sunday, October 28, 2012
Thursday, September 20, 2012
Panic? Don't Panic? Inspiration?
Well, the weather is finally cooling down and I have gone back into the sewing room. Once again I have been tackling the piles and trying to finish SOMETHING. I was sewing more black and white blocks for guy quilts and had a new sewing experience (and that is saying something because I have been sewing almost 50 years and have had a lot of things happen!) I had changed the bobbin and started sewing and instead of the fabric moving nicely along and making lovely perfect stitches I was getting tiny weird stitches that would not go in a straight line! PANIC? Yeah, at first my brain went--oh no, what will I do if the machine is broken? Who can fix it? How can I afford to get it fixed? How can I live without a machine? And then I retraced my steps and took out the bobbin and put it back. Still bad. So I took out the bobbin casing, cleaned and oiled under there. Still bad. The feed dog didn't seem to be working--I popped it down and it didn't come back up. HUH??? Then I tried to raise and lower the foot with the knee lift and it didn't work. HUH?? Usually when that happens it means the knee lift is hitting the side wall so I moved the machine around a bit and got the foot to lift. I tried to sew again and YAY it was working. I think the knee lift was just enough off that the feed dogs didn't move. I was so glad I didn't stop at PANIC and kept trying to figure it out!
On a totally different subject- I am watching Project Runway and they are doing the fabric design challenge so I got curious about what would be involved if a "real person" wanted to design fabric and get it made. The first siteI tried was Spoonflower http://www.spoonflower.com/shop?shop=fabric and I was so excited to see Doctor Who fabric--300 of them! My daughter is obsessed with Doctor Who and my head is spinning trying to figure out something to make her without spending a fortune! My brain is in overload and I am excited. I am leaning toward a Tardis pillow for Christmas (I can say this because she NEVER reads my blog!). Emma is getting very involved with My Little Pony (Oh, yeah, vote for her pony to will the Bronycon contest! http://bronycon.org/vote/ ) and I am trying to think of something she could design and make to sell that would be profitable since the fabric is $18 a yard==bookmarks? This challenge will keep me going for days, I am sure. If anyone has any ideas, please post!
On a totally different subject- I am watching Project Runway and they are doing the fabric design challenge so I got curious about what would be involved if a "real person" wanted to design fabric and get it made. The first siteI tried was Spoonflower http://www.spoonflower.com/shop?shop=fabric and I was so excited to see Doctor Who fabric--300 of them! My daughter is obsessed with Doctor Who and my head is spinning trying to figure out something to make her without spending a fortune! My brain is in overload and I am excited. I am leaning toward a Tardis pillow for Christmas (I can say this because she NEVER reads my blog!). Emma is getting very involved with My Little Pony (Oh, yeah, vote for her pony to will the Bronycon contest! http://bronycon.org/vote/ ) and I am trying to think of something she could design and make to sell that would be profitable since the fabric is $18 a yard==bookmarks? This challenge will keep me going for days, I am sure. If anyone has any ideas, please post!
Sunday, August 26, 2012
Sometimes You Just Have to Step Back
 |
| Novelty fabric strip border |
First up-- sew the vertical seams on the X Marks the spot quilt to get that top done. Check. Next--figure out a border for it. Since it is a lot of novelty prints I went to the box of pre-cut novelty squares. (About once a year I go through my tote of novelty fabrics and cut 6 1/2, 5 1/2, and 2 1/2 inch squares of each fabric). I had done a border for something else using the 6 1/2" squares cut in half then sewing them together as a border and thought that might work. I had also done one with alternating strips made of 3 squares of solids and would have done that again but it would have required cutting those solids again and that was just too much work.
 |
| 1 1/2 " strips used as sashing |
After sewing most of the border I attacked the mess pile and found the black & white check blocks to make into charity quilts for guys so I trimmed up and put it up on the design wall for the next time.
I didn't have any idea what I was going to do when I walked into the sewing room but I am happy with what I came up with when I stepped back and saw what was hanging there all along!
Sunday, July 15, 2012
Summer is for Quilting?????
Hi friends
I have not forgotten about this blog or about quilting. It has just been too uncomfortably hot in the sewing room. I did decide one day to take the ironing board and cutting board out to the kitchen where it is cooler and I set up my laptop to watch Warehouse 13 for a couple hours (Spoiler alert-warehouse blown up, Mrs Fletcher dust!) I got as much pressing and cutting done as I could and would go sew for 10 minutes or so at a time. Summer is definitely not my best time for quilting!
I had to go back to the the X marks the Spot blocks for a while because I actually used up all the "medium florals" on the watercolor borders. But I am excited about that because it gives me something to shop for with my birthday coupon at Emma's Quilt Cupboard! (http://www.emmasquiltcupboard.com/)
So stay tuned for progress--the next cool day I will be back in there!
Sunday, June 24, 2012
Cut-Sew-Press Part Deux
I feel like I am a slacker these days because whenever I go into the sewing room it is just too hot! I really need to figure out a way to have a fan that cools but doesn't blow fabric, threads, and papers all over the room. So far, no success.
I have puttered around in the sewing room making more units for the watercolor borders. This is one of my favorite techniques and I have done it in beiges, black & whites, blues, primary colors w/ lots of novelty prints, and the floral watercolor fabrics. When I make the "units" I make them in various sizes but all the same 6 1/2" width and then put the units together to make the right size for the border. I have also scattered Ohio Stars throughout the border (but have no picture of this one!)
Quickie tutorial: Start with squares, triangles, strips of all sizes in the fabrics you are using. Basically, think Log Cabin and work around the piece, trying not to have any long strips anywhere, as these will probably be "galloping horses" in the end. I try to balance the fabrics in each "unit" so there is a little of everything throughout. When the piece is the width you choose (I use 6 1/2") you are done with that unit.
Here a some examples of quilts with this type of border. Hopefully you can zoom in to see detail, if you are interested. It is a fun cut-sew-press-cut-sew-press technique.
I have puttered around in the sewing room making more units for the watercolor borders. This is one of my favorite techniques and I have done it in beiges, black & whites, blues, primary colors w/ lots of novelty prints, and the floral watercolor fabrics. When I make the "units" I make them in various sizes but all the same 6 1/2" width and then put the units together to make the right size for the border. I have also scattered Ohio Stars throughout the border (but have no picture of this one!)
Quickie tutorial: Start with squares, triangles, strips of all sizes in the fabrics you are using. Basically, think Log Cabin and work around the piece, trying not to have any long strips anywhere, as these will probably be "galloping horses" in the end. I try to balance the fabrics in each "unit" so there is a little of everything throughout. When the piece is the width you choose (I use 6 1/2") you are done with that unit.
 |
| Blue Border |
 |
| Watercolor floral border- units are light,medium, &] darks |
 |
| Navy borders X2 |
.JPG) |
| Primary Novelty border |
 |
| Black & white borders used as strips on the back |
Thursday, May 31, 2012
Saving Time so you can sew more!
 |
| Zigzag 9-patch made in an afternoon workshop |
Not only did I learn this technique but went away with a great handout of different settings which I have used and shared with every class I taught. So thank you, Marianne!
 |
| Line the strip set up with cutting board lines |
 |
| Place 2nd strip down from 1st strip about 1/2" down |
 |
| Lay out all strips until you have no more room |
 |
| Line up ruler w/ vertical lines, then cut the bruised edges off |
 |
| Cut through all layers (the same measurement as width of strips) |
The great time saving technique is especially great for 9-patches. You start by sewing the strips in groups of 3--2 sets of dark/light/dark and 1 set of light/dark/light. (It is important when sewing strip sets together that you sew top to bottom, then bottom to top, then top to bottom, etc. or else your strip set will stretch and curve and you don't want that.) Press the seams toward the darks. Let's go with 2" strips for the sake of this exercise. After the strips are pressed, line up one piece on your cutting mat using the lines on the mat as a straight line. Take the next strip set and stagger it about 1/2" down from the first, making sure that you are far enough down that the seams aren't on top of each other. Keep laying down as many strips as you can fit on the board, keeping the strips straight using the lines on the mat. You will then cut 2" pieces all along the whole thing. This works so well for several reasons--You can cut a lot of strips in 1 cut, and because the strips are all stuck together and lined up with the lines on the mat they do not slip and you get nice straight cuts, and you are never cutting through more than 4-6 layers of fabric at a time. Try it and you will wonder why you spent so much time sub cutting before!
 |
| Continue cutting to the end of pieces |
(I apologize for the confusing pictures. I am working with black and white and actually thought it would make a good demo, but you can't tell where one piece starts and the next begins! I placed them on the board alternating black and white so in the final layout there are 6 strip sets. Hope you can figure this out)
Sunday, May 27, 2012
Charity Begins at Home
Goodness, I haven't posted in over a week but that doesn't mean I haven't been in the sewing room. I have gone in and started sewing and it is so hot I had to quit when the first drop of sweat ran down my back! I got the funky border finished and on the 9-patch novelty quilt, made some more X marks the spot blocks, and did some other puttering around.
I also did some research into the Downy Quilts for Kids program to see what their requirements are for quilts to donate. Check it out http://www.quiltsforkids.org/about/. Basically they have to be around 38 x 45", all cotton, and machine quilted. Darn it but the one I just finished is too big for this but I will put it aside for another donation. I have a mission to make as many quilts as I can to donate and use up all these fabrics! You would think with this mission in mind I wouldn't buy any more fabrics but sometimes I just HAVE to go into the fabric store and pick up something new! (It kills me because I live within a couple blocks of 2 fabric stores and drive past every day!). Right now I am really low on black and whites and have no yellows or oranges to speak of and you really need brights for kids quilts so that is how I justify dropping a few bucks in there.
Quilts for Kids really needs quilts for teenage boys right now and that is a hard one. I was thinking about it and got inspired when I turned on the TV today and caught the start of the Indy 500. I have never watched a Nascar race and had never seen the beginning. When they showed the pace car and the pack all lined up in groups of 3 I thought it was one of the coolest things I have ever seen in sports! It got me thinking about the checkered flag and cars. So today I started making black and white checked blocks and I will probably go nuts making tops with checked blocks and borders. I have several ideas but I do need more "guy" fabrics. I have a couple with cars and sports. So if anyone would like to donate to the cause with their scraps of "guy" fabrics I would love to take them. Just leave me a message here or on Facebook or send me an e.mail and we will work something out. Meanwhile I am going to keep sewing black and white strips together!
Wednesday, May 16, 2012
Novelty Prints-Love 'Em!
I decided I had to step away from the Wacky nightmare quilt and assembling the tops I had arranged on the wall and do something totally different for a day or so. So I reached into the UFO box and pulled out a ziploc bag of 5" 9-patch blocks of solids. Hmmm 5"--isn't that the same size as those novelty squares I got a while back in that trade? YES! So I alternated them and will have a nice child's quilt for charity.
Made me think of all the quilts I have made with my huge collection of novelty fabrics. About once a year I go into the box and cut 6 1/2", 5" and any other size I think I might use out of each fabric. I love novelty prints but last time I went into the box I realized how tired I am of my fabrics so I found a place that does organized fabric swaps (it was a site called Fabric Stash Club and they seem to have shut down). I think I sent 50 5" squares and I got back 50 totally different pieces. I think I will share some of my different novelty quilts to show ways to use various sizes of squares. You will also see my extensive use of strippys.
 |
| Novelty Attic Windows-6" sq. |
.JPG) |
| I Spy-3" squares w/ 6" squares cut in half in the border |
 |
| Double 9-patch w/ 3" squares (6" sq cut in fourths) |
 |
| 6" sq w/ star sashing (this sashing takes LOTS of fabric |
 |
| 6" sq with strippy sashing |
 |
| 5" squares w/ solid attic windows |
.JPG) |
| 6" sq w/ strippy sashing & 4" squares in border |
.JPG) |
| 6" sq cut diagonally & pieced w/ solid strippys |
 |
| 6" wide pieces w/ white/black fabrics sashing |
 |
| 5" sq w/ bright attic window |
 |
| 4" sq w/ zig zag sashing (took LOTS of red!) |
 |
| Braided novelty-started w/ 6" sq cut in half |
 |
| Pinwheels made from same pieces as braided novelty |
 |
| Star sashing w 6" squares |
 |
| 6" sq with star sashing |
 |
| 6" sq with strippy sashing |
 |
| Border is 6" sq cut in half |
 |
| Star sashing w/6" sq |
Sunday, May 13, 2012
Do as I Say, Not as I do--Plan Ahead!
 |
| The first Wacky One |
 |
| 3rd Wacky-Rochelle's |
 |
| 2nd Wacky One |
On the positive side-the X Marks the Spot is on the wall and I am checking it carefully for any "galloping horses". I love to do things with lots of fabrics but I do get a bit fussy when I arrange the blocks--no matching fabrics touching each other, and if there are any fabrics that jump out (in this case, yellow, orange, lime green, and hot pink) they must be evenly balanced throughout the quilt so your eye does not stop in one spot but moves on easily. As I made each block, I tried to include a bit of each of those colors in the block so they would be easier to arrange. Hopefully I can get them together today and since the design wall is exposed I might as well arrange the floral log cabin too. I'm about to the point where I have to do borders and layer and start quilting--not my favorite things to do. This is when I wish for a quilting clone who likes to do those things!
Wednesday, May 9, 2012
Be Safe, Quilters
I'm making progress! I finished making the X Marks the Spot blocks and actually cleaned up the floor of the sewing room. The room looks spacious (not really, but comparatively!). I am still sewing strippy pieces for the wacky log cabin (thought I had enough--Wrong!) but I may have enough now. When I went to the cutting table to trim and square I couldn't find the rotary cutter anywhere. Not only was the fabric cutter missing, but the paper one also. OOOOH Mystery!!!! I would have asked Emma if she had seen them but #1 she has been in bed sick for 2 days and #2 she is scared to death of the things. I knew they weren't on the floor-it was clean. The cutting table was neat and organized and that left the sewing table which wasn't all that bad either with all the strips and pieces neatly organized in their boxes. I could even easily find the TV remotes which is always a challenge. Then I picked up the sewn pieces to move to the ironing board and there they were. Why? I don't know. But while I was finally trimming I decided it was a good time to write about rotary cutter safety.
Now the obvious issue with a rotary cutter is the danger of cutting yourself so I always have a couple rules: #1-- always have a sharp blade. The harder you have to press to cut, the more likely you are to hurt yourself. #2--No bare feet in the sewing room. No matter which cutter you have, if you drop it on the floor, it can open a little and if it lands on your foot you're in trouble. My friend Cheryl used to have a fabric shop and she had this happen to someone so she had to make the "no sandals" rule there. #3--ALWAYS ALWAYS ALWAYS close the cutter before you lay it down. So obvious but apparently the hardest thing to learn!
Now the less obvious danger with the rotary cutter is actually one that can be the MOST dangerous--the way you hold and use the cutter. Ergonomics (properly fitting the body to the tool and the job) is so important. The least stressful position of the body is a neutral position. For the hand and arm, neutral is your arm hanging limp at your side while standing. Well, that is not practical so the next best thing is a natural bend at the elbow-90 degrees up in front of you. Probably not too practical either but we're getting there. In this position look at your hand--it should be pointing straight ahead, thumb up. Now put the cutter in your hand in this position, placing your index finger on the top of the cutter. Your arm should be a straight line from fingertip to elbow. This is the best and safest position for holding the cutter.
Now for cutting. Table height is important. Standing is better than sitting unless you can position yourself higher than the table. With your index finger on top of the blade, your wrist straight and in neutral, cut straight forward away from your body. Turn the fabric, not your shoulder or your wrist. It makes me CRAZY to see people cutting across in front of themselves, holding the cutter with the wrist bent and not supported by the finger. How many quilters do you know who have had carpal tunnel or rotator cuff problems? Too many! These things can be prevented by proper ergonomics! And also--take frequent breaks because the final issue of ergonomics is repetitive stress injury--if your arm, elbow, shoulder, wrist or hand hurt they are telling you something--take a break!!!
So, please, friends, be careful out there. Reteach yourself to cut if you have to, but be safe!
Saturday, May 5, 2012
Threads-We take them for granted
I was sewing the other day and finished up the 1200 yd spool of gray thread that I would swear I just bought. I switched to beige and finished off that spool and fortunately had another one in reserve. We tend to just sew and sew and not think about the thread we're using, but it is important. Without the thread nothing would hold together. With the wrong thread, something could be ruined. With the perfect decorative thread, you can create art. When the thread runs out your day could be ruined. Old thread is weak and can break and new thread is so expensive that it is an investment.
I took a class in using decorative threads and learned a valuable lesson which is to "match the thread to the fabric". Cotton thread is weaker than poly/cotton, which is weaker than polyester, which is weaker than nylon. If you sew with a thread weaker than the fabric, the thread can break (hence the classic ripped crotch problem). If the thread is stronger, the fabric will rip before the thread breaks and you have a hole you probably can't fix. If the thread and fabric match, everything will wear evenly. I have a perfect example of the wrong match of thread and fabric. One of my purchased comforters is quilted with nylon thread which is not only strong, but sharp. The fabric is tearing and separating all around the quilting and there is nothing I can do. Another purchased comforter is a poly/cotton blend and must have been quilted with cotton because the stitching has popped all over the quilt.
And since I mentioned nylon thread-I do not recommend it for any quilt that will be actually used by humans! Fine and dandy for wall hangings but just not good for lap or bed quilts and especially not for baby quilts. The reason is that the thread is very strong and feels sharp where it is cut. Also if you miss a loop somewhere it is very dangerous to a little toe or finger that might get caught in it-very scary! Unfortunately I learned this the hard way. My favorite thread for machine quilting is a very fine basting thread, which I am having trouble finding any more. It is just the right strength but fine enough not to be too visible. Every now and then I do a search, but haven't replenished my supply.
I really love the variegated threads for machine quilting--expensive but beautiful. I am so glad that they are now available in big spools and I am very thankful for those regular JoAnn Fabrics coupons!
So, check out your threads and make good choices because we want all of our hard work to outlast us!
Thursday, May 3, 2012
Cut, Sew, Press, Cut, Sew, Press-That's all quilting is!
Random thoughts:
I was inspired by my list of projects in the last blog so I finished piecing the Barn Raising top and now it needs borders. The floral log cabin blocks are squared up, most of the wacky log cabins are done and ready to be put together and I am up to 42 out of 48 X Marks the Spot blocks. Sewing room is still a mess but the end of that mess is in sight. I know it is stupid but I am happy to see a trash can full of fabric scraps!
I really am making an effort to get the stash down. I keep saying I want to "get it down a tote" but now matter how much I cut and sew, the same totes are still full!
A few years ago I did a quilt of blues, greens, and purples. I cut a 2" and 3 1/2" strip off each piece of fabric and this is the quilt I made for my nephew. The level of fabric didn't go down, I had a box full of pieces left over, and years later I have made 3 more quilts without cutting another strip! These are the other incarnations of the blue, green, purples, and there is still a ziploc bag full of squares.
Recently a friend asked me how I could sew all those little pieces together. I told her there are very few little pieces, that quilting is a lot of CUT,SEW,PRESS,CUT,SEW,PRESS until you are done. Piece of cake!
Today while I was pressing I realized I left something off my list of "Things I Can't Live Without"--Magic Sizing! I use a LOT of different fabrics of different weights and using the sizing stabilizes everything and keeps bias edges from stretching. Best discovery in recent years!
 |
| Full trash can! Yay! |
I really am making an effort to get the stash down. I keep saying I want to "get it down a tote" but now matter how much I cut and sew, the same totes are still full!
 |
| Tim's Blue,Green, Purple #1 |
Recently a friend asked me how I could sew all those little pieces together. I told her there are very few little pieces, that quilting is a lot of CUT,SEW,PRESS,CUT,SEW,PRESS until you are done. Piece of cake!
Today while I was pressing I realized I left something off my list of "Things I Can't Live Without"--Magic Sizing! I use a LOT of different fabrics of different weights and using the sizing stabilizes everything and keeps bias edges from stretching. Best discovery in recent years!
 |
| A Mouse in a Maze |
 |
| Criss Cross |
 |
| Diagonal set |
Sunday, April 29, 2012
Oh My, What a Mess!
Oh my goodness! I have worked myself into quite a mess right now! It happens every time I dig into the scrap bucket. I have 4 different projects going right now--there's a pile on the sewing table, the cutting table, and the pressing pile, not to mention all the stuff on the floor. The fabric storage bins are all over the place cuz I have dug into all of them. I like to sew and sew until I finish something and then I clean up the mess. (Or I clean up if "company" is coming!) I better not start something else or I won't be able to get in the room! PROGRESS: 19 X marks the Spot blocks completed (out of 48)
Wacky log cabin blocks almost ready to put together, just a couple rounds to go
Floral log cabin blocks just need squared up and put together
Floral Barn Raising needs horizontal seams finished and borders put on
Floral Zig Zag 9-Patch needs borders (no idea what to do here)
Based on this list the mess will be with me another week or so!

 Funny thing is--when I scrapbook I make it a rule to clean up after page or page spread because I don't want to duplicate embellishments, papers, scissors, punches, whatever. I start new on each one. Works for me!
Tuesday, April 24, 2012
Beware of the Galloping Horse
Today I worked some more on the X marks the spot, where anything goes as far as fabrics go. Whenever I get tired of the fabrics in the pile I dig deeper into the scraps. I even opened the blues tote and dug out some blues for variety. On this one I just mix it up with color, pattern and strip size and try not to make any combinations that are distracting or "galloping horses".
I also did another pink round on the wacky log cabin and as I was sewing the pink I was looking for possible "galloping horses" in the strippy round. I remembered that on one block I had accidentally put the same fabrics together in a corner and have been debating all week whether to fix it or keep going and see if it became less visible. Well, I looked at each block and can't find the spot so it must be OK and I am leaving it.
So what is a "galloping horse" you ask? I wish I could remember who the expression came from but I took it and shared it with every class I ever taught. (I got it from a lecture at a Quilter's Gathering in Westford one year and that is all I can remember and if anyone knows who it came from I would love to give credit). What it means is "don't sweat the small stuff". A lot of quilters obsess over every seam and fabric and color choice and use that darn seam ripper way too much. Unless you are making something to be judged, do you need to be perfect? If a man on a galloping horse can see it, it MUST be fixed! Take care of that "galloping horse" ASAP. So stand back, walk by, take a picture or look at it from a distance and if nothing catches your eye as out of place or distracting then you are good.
An example: When I was teaching a beginner sampler class I accidentally scorched a piece of sashing right in the middle of the class sample. I decided to leave it as an example for the class (2 lessons--don't scorch! and here's a galloping horse right here!). Let me say that as soon as I finished the last class and was ready to quilt the top I replaced that piece immediately and this is the finished wall hanging, minus scorch.
So please don't be too hard on yourself when you are quilting. Watch for galloping horses and let the other stuff stay put and allow yourself to move on to new and exciting quilting!
I also did another pink round on the wacky log cabin and as I was sewing the pink I was looking for possible "galloping horses" in the strippy round. I remembered that on one block I had accidentally put the same fabrics together in a corner and have been debating all week whether to fix it or keep going and see if it became less visible. Well, I looked at each block and can't find the spot so it must be OK and I am leaving it.
So what is a "galloping horse" you ask? I wish I could remember who the expression came from but I took it and shared it with every class I ever taught. (I got it from a lecture at a Quilter's Gathering in Westford one year and that is all I can remember and if anyone knows who it came from I would love to give credit). What it means is "don't sweat the small stuff". A lot of quilters obsess over every seam and fabric and color choice and use that darn seam ripper way too much. Unless you are making something to be judged, do you need to be perfect? If a man on a galloping horse can see it, it MUST be fixed! Take care of that "galloping horse" ASAP. So stand back, walk by, take a picture or look at it from a distance and if nothing catches your eye as out of place or distracting then you are good.
 |
| This is the beginner sampler that I scorched right in the middle sashing |
So please don't be too hard on yourself when you are quilting. Watch for galloping horses and let the other stuff stay put and allow yourself to move on to new and exciting quilting!
Sunday, April 22, 2012
Sometimes a new toy can be very motivational!

Thursday, April 19, 2012
Other Quilters Are so Inspirational
Yesterday I checked out a new blog http://fabrictherapy.blogspot.com/search?updated-max=2012-04-02T10:47:00-04:00&max-results=7&start=4&by-date=false. ( I do not promise this link will work--I don't know what I am doing, so please let me me know if you saw it!) First of all this person is CRAZY ORGANIZED! And she is obviously a very good quilt teacher. I urge everyone to check out this blog. I'm following it now and haven't had time to read everything. She writes a LOT. I have highlighted the project I couldn't resist trying since I have an endless supply of scraps. I actually spent an hour today on something other than florals and it was a nice change of pace. Now I have a stack of trimming up to do on three projects. But that is the way I work best. I like to have lots of projects going at once and then I get to the point of finishing them up and it is exciting for me.
Just a side question--Do you have a part of a project that you do not enjoy doing? I really don't like sewing on borders at all. When the project gets large I have to force myself sometimes to get the thing done. I have this imaginary "Quilt World" in my head where a quilting partner loves to do the things I don't and we can work together as a team. But then I always decide I can't give up that much control and just have to suck it up and do it myself. It always helps to work with friends or at least have something good to watch or listen to to distract myself. Right now that is Doctor Who and The Colony. Almost done though, and then I have to find some other series to get into. Suggestions?
Anyway, check out the Fabric Therapy blog and be inspired!
Wednesday, April 18, 2012
Quilters are the Best!
I was reminded today of how special quilters are and how welcoming and friendly quilt shops are. Emma and I are in the process of getting her ready for prom in 2 weeks. Dress has arrived from China and is beautiful and is off to the dry cleaners to be professionally pressed (3 skirts--too much for me!!), red high heels are purchased, hair has been consulted on, and all she needs now is a nice necklace. So we visited a bead shop here in town to see if they had anything or to get inspiration. We were in this little store for 5 minutes and NO ONE acknowledged us at all. Needless to say I will never go there again. When we left I said, "That would never happen at a quilt shop".
When I got home in the quilt room I managed to make another round on the wacky log cabin. I think I like it!
When I got home in the quilt room I managed to make another round on the wacky log cabin. I think I like it!
Monday, April 16, 2012
Things I Can't Live Without
I wanted to sew so badly today but it was just TOO HOT! It was almost 90 today! My sewing room doesn't have overhead light so all the light comes from incandescent lamps. After a while the heat from the lamps and the iron make it quite warm (in the winter it was the best room in the house, but now...yikes) I did get one round of the wacky log cabins done so that was good and I found myself noticing all the tools I just can't live without. The rotary cutter has a new sharp blade, the table is covered with a cutting board, the rulers are filed in their file boxes, the Bernina just keeps keeping on. But in addition to those basics I find myself relying on things like a clothing lint brush for cleaning off the ironing board and cutting board, a "garbage bowl" (thanks Rachael Ray for that idea) on the counter, plastic shoe boxes to keep things organized, my Quilters Rule square up rulers in 2 sizes and colors which I use all the time, wipes and paper towels for cleanups (I also scrapbook in there), power strips to keep everything going (and which I can just step on to turn off the lights & machine). Having a set up sewing room is a wonderful luxury and it is my little sanctuary.
Sunday, April 15, 2012
"Waste Not Want Not"
 |
| Rochelle's Purples |
Pulling together all the fabrics was as simple as going to my strip collections. My friends can vouch for the fact that I do not throw fabric away. Leftover fabrics are either cut into strips of various widths, squares, or half square triangles or they go in the scrap bucket. I have plastic boxes of each size and shape all piled up and ready to go. Yesterday I pulled out everything that would work and started sewing and today I got the first round of the block done.
I save all my scraps and nothing goes into the trash unless it is too small to make a 1" strip or 1 1/2 " square. Needless to say sometimes it takes a while to fill the trash!
 |
| I Spy Crazy Quilt |
I have so much fabric that I will never use it all up so that is why I have been making so many quilts and tops for charity. It is a fun challenge with a payoff at the end--everybody wins!
Saturday, April 14, 2012
Quilt Memories
 |
| Great Grandma Larson's Quilt |
Grandma pieced and my Grandma machine quilted way back when I was about 12. They also made a doll size one for me. Whenever I look at the crooked mismatched pieces I can see Grandma and Aunt Hazel sitting in their tiny living room in their side by side chairs. Hazel was pulling scraps from a paper bag and cutting pieces with scissors which she piled on the end table between them. Hazel couldn't see very well and had a paper template so the pieces were not too precise! Grandma then stitched them together by hand--color didn't seem to matter much. My quilt has pieces from my bathrobe and my cousin Connie's and my Easter dresses, my brothers' flannel pajamas. My Grandma used cotton batting and a white fabric on the back. I have studied textiles, shopped fabric stores for years and sewn forever and I still cannot identify what type of fabric it is. It is just so soft! It is one of my prized possessions and is the one I still choose to snuggle under.
I always sew with either music playing or a video. I have never had "live TV" in the sewing room. Over time the music has gone from cassette, to CD to Ipod to ITunes on the laptop or Kindle. I still record my favorite shows on VHS and watch them while I sew. I couldn't begin to imagine how many episodes of Regis I've watched while quilting! I have quilts that remind me of a certain Mary Chapin Carpenter CD, or Regis, or Ellen. The ones I am doing now will always be my Doctor Who quilts because I have watched 6 seasons of Doctor Who this winter while sewing! A couple of them remind me of a World Series or playoff game I watched while sewing binding.
Some quilts remind me of the shopping trips and quilt shops and shows where I got the fabrics or learned a new technique. They remind me of the friends who shopped with me or gave me the fabric scraps. Some of the fabrics even release a scent when they are ironed and I am taken back to a day when a soup or stew or something yummy was cooking.
When I give a quilt to someone I hope they make their own memories around the quilt and hopefully remember the person who made it with love.
Friday, April 13, 2012
My first blog!
My first blog post--where do you start? I guess I will start at the present and move backwards and forwards from here. After making lots of quilts and giving most of them away I was finally talked into making something and trying to sell it on Etsy. I don't know about other quilters but I have to stick to my intention when making something. If I make it for myself I can not give it away. If it is intended as a gift for someone that is where it has to go. I have made probably 60 quilts and tops for charity and as long as that is the intention I am very happy to give them away. (I do take a picture and put it in my quilt gallery, however!). So if I am going to sell something it has to be made for that purpose.
The idea I landed on was to use my florals. I had all my 2" squares of watercolor fabrics still sitting around (lots of them!!) and I had previously made border units for charity quilts which I had left over. I made a floral log cabin with a chain of dusty rose going through it. I also started making other blocks with the watercolor squares so it is quilt #2. Then I kept going and made 9-patch blocks with the squares and they are going to be the center of log cabin blocks so that is quilt #3. Quilt #4 is a Zig Zag pattern with the 9-patch blocks and I am almost done using up the squares! It's a series! I really enjoy making the border units and hopefully I have enough for all 3 quilts.
I look forward to posting pictures of these quilts as they are finished and sharing my thoughts and experiences while making them.
Subscribe to:
Posts (Atom)